Have you ever dreamed of thick and beautiful lashes but haven’t made it to a professional yet? Cluster lashes are your solution! 🤩

What do you need for cluster lash application?
Before starting, make sure you have all the necessary tools:
- Cluster lashes (according to your desired style – Classic, Volume, Wispy or Hybrid)
- Quality lash glue
- Tweezers for attaching the clusters
- Sealant
- Remover (for later use)
- Oil-free makeup remover
- Mirror (preferably a magnifying mirror)
- Cotton swabs or pads for makeup removal
Preparation for cluster lash application
Proper preparation is half the battle:
- Clean the eye area thoroughly. Remove all eye makeup with an oil-free makeup remover. Oil can prevent the glue from adhering properly and reduce the longevity of your cluster lashes.
- Check the length of your cluster lashes. If necessary, trim them to your desired length. It’s always better to start longer and then shorten as needed.
- Comb through your natural lashes. This helps you see exactly where to place the clusters.
- Choose the appropriate style. Do you want Classic for a natural look, Volume for more fullness, Hybrid for a catty look, or Wispy for a dramatic appearance?
Step-by-step application guide
Be patient and precise when applying clusters. The process may seem slow at first, but with practice, it gets easier! 💪
- Apply the lash glue in a thin layer from the outer to the inner corner of the eye. Focus especially on the inner and outer corners, where clusters tend to come off more easily.
- Allow time for the glue to become tacky (about 15-20 seconds). The glue should be sticky but not completely dry. This will give you the best results.
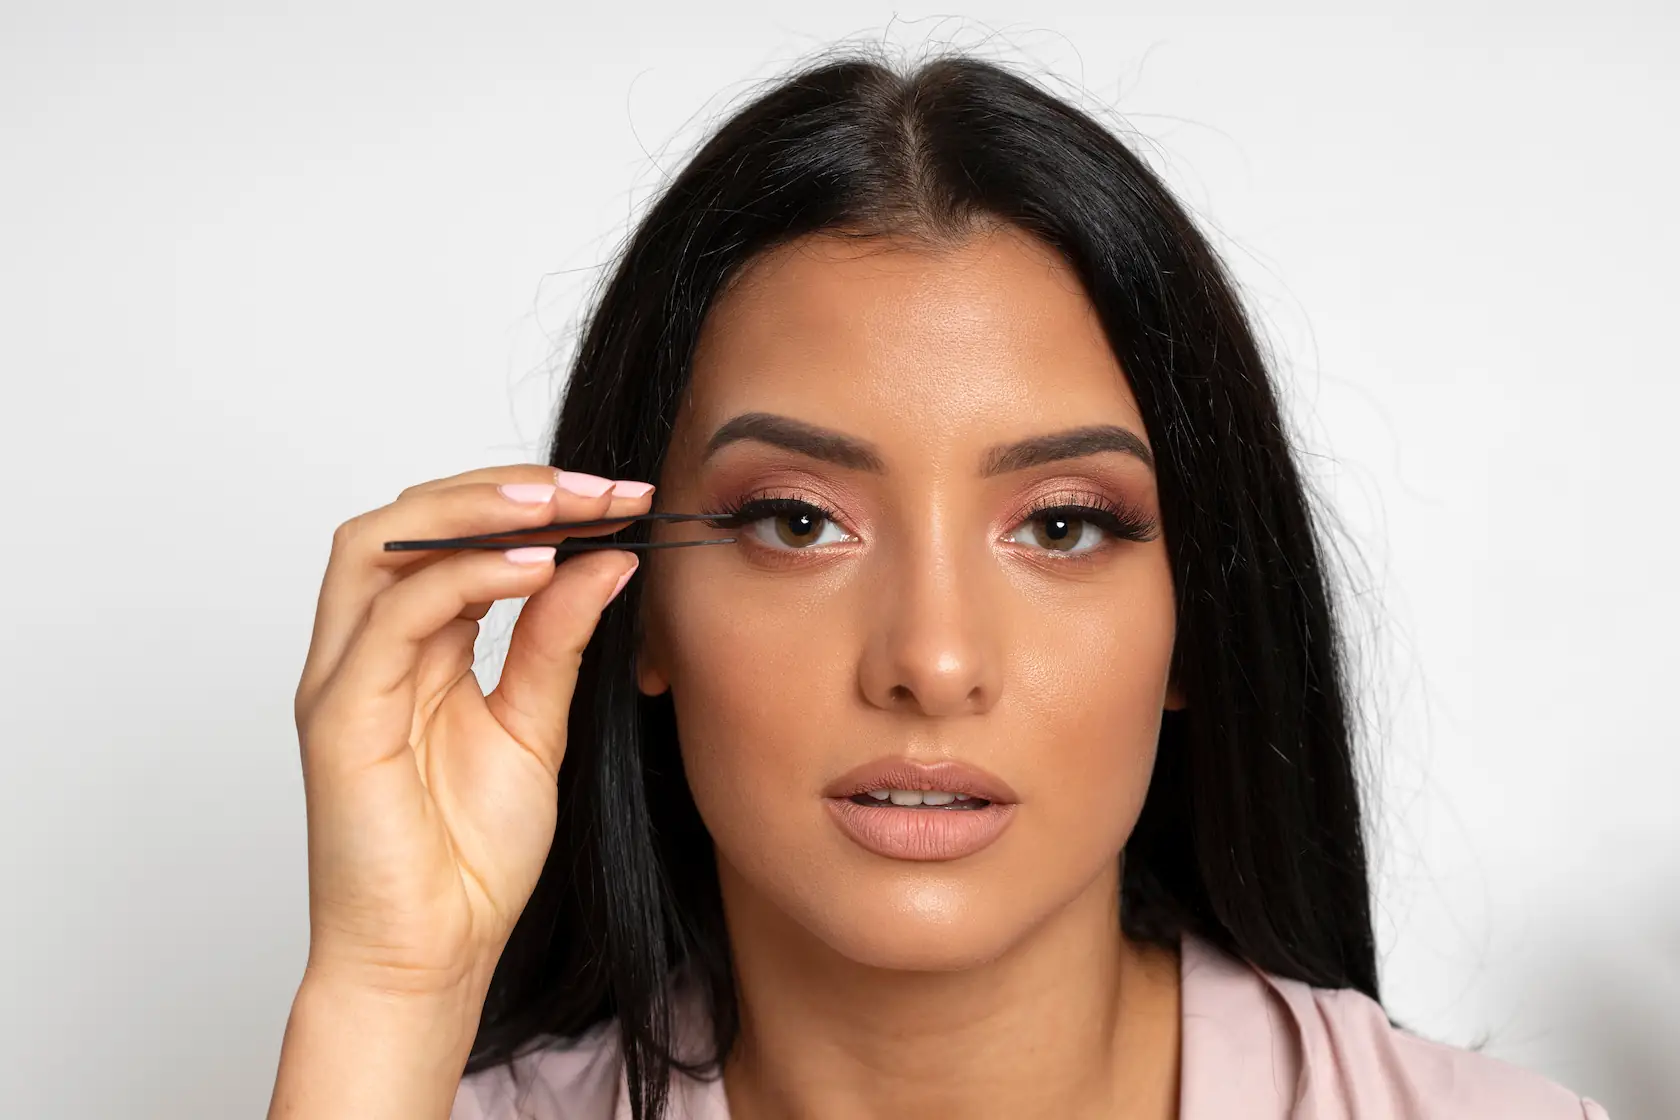
- Using tweezers, pick up a cluster and begin application from the outer corner of the eye.
- Place the cluster about 1-2 mm away from the lash line, not directly on the lash root. This reduces the risk of irritation and ensures better adhesion.
- Attach the clusters underneath your natural lashes, not on top. This creates a more natural look and reduces discomfort.
- Continue applying from the outer corner to the inner corner, placing the clusters as close together as possible. Avoid stacking them on top of each other, as this can create excessive weight and damage natural lashes.
- Use about 4-6 clusters per eye, depending on the desired density and eye size.
Finishing and sealing
Once all clusters are in place:
- Apply a sealant to your lashes to strengthen the adhesive and provide additional durability. This protects the clusters from moisture and heat, helping to keep your lashes looking beautiful for longer.
- Wait 15 minutes and then gently squeeze your lashes to fully secure them.
- Avoid water, steam, and saunas for 24 hours after application. This gives the glue time to fully bond.
Caring for your cluster lashes
To keep your cluster lashes beautiful for longer:

- Clean your lashes gently with an oil-free cleanser, avoiding rubbing and pulling.
- Don’t use oil-based products near your cluster lashes, as these can break down the adhesive.
- Avoid curling your lashes or rubbing them vigorously.
- Be careful when sleeping to prevent your lashes from getting crushed against the pillow.
- Don’t wear heavy eye makeup with cluster lashes – they’re already striking on their own!
Troubleshooting
If you experience difficulties, try the following:
- Clusters not staying put? Make sure your eye area is truly clean and oil-free. Perhaps you didn’t give the glue enough time to become tacky before placing the cluster.
- Lash glue visible? You probably used too much glue. Gently remove excess glue with a cotton swab once it has dried.
- Lashes feel uncomfortable? The clusters might be placed too close to the eyelids or lash root. Next time, place them slightly further away (1-2 mm).
- Eyes irritated? Remove the lashes immediately and clean the eye area thoroughly. Next time, do an allergy test with the glue 24 hours before full application.
Removing cluster lashes
When your cluster lashes have reached the end of their life (5-7 days):
- Apply remover gently to your lashes.
- Wait 1-2 minutes for the glue to dissolve.
- Remove the clusters gently, avoiding pulling.
- Clean the eye area with a gentle makeup remover.
For more detailed instructions, check our cluster lash removal page and cleaning tutorial page.
What to avoid when using cluster lashes?
- Don’t apply regular mascara to your clusters – this can make them sticky.
- Avoid vigorous rubbing or pulling.
- Don’t leave clusters on for longer than 7 days, as this can damage your natural lashes.
- Don’t use all-purpose glue – only use glue specifically designed for eyes.
- Don’t stack clusters on top of each other – this puts strain on your natural lashes.
Time investment and expectations
If you’re a beginner, take your time:
- Your first application may take 15-20 minutes
- With practice, the process becomes faster (5-10 minutes)
- Remember to account for preparation time
After a few applications, you’ll develop your own technique and pace!
Now you’re ready to try Afterglow cluster lashes and surprise your friends with your beautiful lashes! With clusters, you can enjoy perfect lashes for 5-7 days without the need for daily mascara application. Choose your favorite cluster lash style from our product category and start your lash transformation today!